This tutorial demonstrates how to display facebook user details
on your website.
This is part 2 of Facebook API integration in ASP.NET series. In
order to complete this tutorial, you need to have facebook login
button integrated in your app. Please check out Part 1 -
Integrating Facebook Login button in ASP.NET MVC 4
application for insturctions on how to do so and
working solution that you need for this tutorial.
What we are going to in this tutorial, is using access token we
obtained from fb (upon login), we'll contact API server and request
user details. Facebook Graph API is using Json to exchange
information. On API request, we'll get Json string back which in
order to use in our app, needs to be converted to C# object.
Models
Firstly, let's create 3 new models. These will represent Json
structure contained within string that we're getting back from
facebook. Open up solution we created earlier and add 3 C# classes
to Models folder.
FacebookLocation.cs
namespace FacebookLoginButton.Models
{
    public class FacebookLocation
    {
        public string id { get; set; }
        public string name { get; set; }
    }
}
Picture.cs
namespace FacebookLoginButton.Models
{
    public class Picture
    {
        public PicureData data { get; set; }
    }

    public class PicureData
    {
        public string url { get; set; }
        public bool is_silhouette { get; set; }
    }
}
FacebookUserModel.cs
namespace FacebookLoginButton.Models
{
    public class FacebookUserModel
    {
        public string id { get; set; }
        public string email { get; set; }
        public string first_name { get; set; }
        public string last_name { get; set; }
        public string gender { get; set; }
        public string locale { get; set; }
        public string link { get; set; }
        public string username { get; set; }
        public int timezone { get; set; }
        public FacebookLocation location { get; set; }
        public Picture picture { get; set; }
    }
}
Rebuild your solution.
Facebook API connector and Json -> C#
converter
Now, we need to install 2 dlls. Facebook.dll will make
contacting Facebok API server easy peasy and Newtonsoft.Json.dll
will helps us with Json string -> C# object conversion. Below,
in article attachments section, there is Required
dlls download available. Unzip it and drop folder content
(4 files in total) into /bin folder inside your
app. Once you've done that, in Visual Studio, right click
References folder, and add reference to both .dll
files that you've just dropped into /bin.
User data controller and view
Since we've now got all models in place and all required
software installed, we can add some logic to AccountController.cs
that we created in previous tutorial, that will contact facebook
api and return data to the view for a display.
Open up Controller/AccountController.cs and add following
method:
[HttpGet]
        public ActionResult UserDetails()
        {
            var client = new FacebookClient(Session["accessToken"].ToString());
            dynamic fbresult = client.Get("me?fields=id,email,first_name,last_name,gender,locale,link,username,timezone,location,picture");
            FacebookUserModel facebookUser = Newtonsoft.Json.JsonConvert.DeserializeObject<FacebookUserModel>(fbresult.ToString());

            return View(facebookUser);
        }
Don't forget to add using statement in the top of the file as
well - using Facebook;
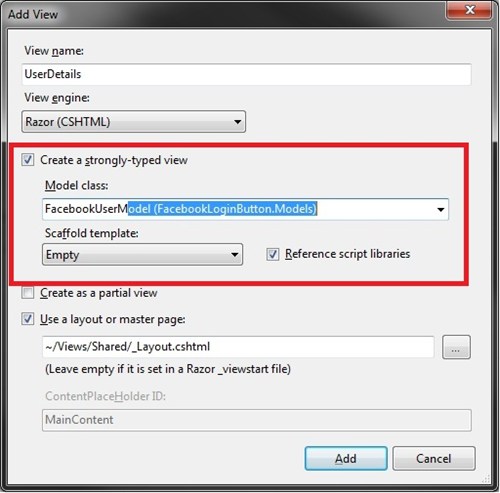
View() should be highlighted in red indicating that there is no
view file (.cshtml) associated with this method. Right click on
View() and select add view. Now, be carefull, since we're passing
an object to it, it needs to be a strongly-typed view. This will
make all object properties accessible via @Model variable. Before
clicking OK, make sure all properties in the window are set as on
following screen:
Once the view has been added, you should find a new .cshtml view
file under Views/Account/UserDetails.cshtml. Open that file and
paste in following code:
@model FacebookLoginButton.Models.FacebookUserModel

@{
    ViewBag.Title = "Part 2 - Facebook Login Button";
    Layout = "~/Views/Shared/_Layout.cshtml";
}

<h2>Part 2 - Facebook User Details</h2>

<table>
    <tr><td>Picture</td><td><img src='@Model.picture.data.url' /></td></tr>
    <tr><td>Facebook Id</td><td>@Model.id</td></tr>
    <tr><td>Username</td><td>@Model.username</td></tr>
    <tr><td>First Name</td><td>@Model.first_name</td></tr>
    <tr><td>Last Name</td><td>@Model.last_name</td></tr>
    <tr><td>Gender</td><td>@Model.gender</td></tr>
    <tr><td>Locale</td><td>@Model.locale</td></tr>
    <tr><td>Location</td><td>Id - @Model.location.id<br />Name - @Model.location.name</td></tr>
    <tr><td>Timezone</td><td>@Model.timezone</td></tr>
    <tr><td>Facebook Link</td><td>@Model.link</td></tr>
</table>
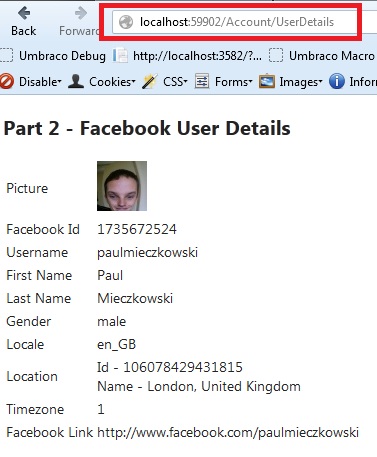
Finally, rebuild your solution, make sure you dont have any
errors on build, press F5 (unless you have it configured as a
host), login to facebook using facebook button and go to
/Account/UserDetails url. If you've done
everything right, you should see following screen:
Good luck!
Btw. You may also consider extending session timeout to keep
facebook access token in the memory for a little bit longer. Also,
it'd be worth to add try/catch login to UserDetails() method in
case accessToken variable in nor present in Session object.
Feel free to check out my other facebook tutorials! Aaaand leave a comment if
you found it helpful. I love getting comments :)
Tagged: .NET 4
ASP.NET MVC
C#
Facebook Graph Api
Facebook User Details
JSON
MVC 4