In this tutorial, I'll show you how to get your friends listing
integrated with MVC app. For a purpose of this tutorial, I use MVC
4 project, however this and any other facebok tutorial in this
series is convertible into older versions of MVC as well as
standard web forms project.
This is part 3 of Facebook API integration in ASP.NET series. In
order to complete this tutorial, you need to have facebook login
button integrated in your app. Please check out Part 1 -
Integrating Facebook Login button in ASP.NET MVC 4
application for insturctions on how to do so and
working solution that you need for this tutorial.
Here's the plan! Firstly we'll create a controller that will
communicate with facebook API and request friends listing. Once
we've got the data, we'll convert it into native app object and
return it to our view.
Models
Firstly, let's create a new model. In Visual Studio solution,
right click on Models folder and select Add New Item -> C#
class. Name it FacebookFriendsModel.cs and paste
in following code:
using System.Collections.Generic;

namespace FacebookLoginButton.Models
{
    public class FacebookFriendsModel
    {
        public List<FacebookFriend> friendsListing { get; set; }
    }

    public class FacebookFriend
    {
        public string name { get; set; }
        public string id { get; set; }
    }
}
We'll use this class for Json -> C# conversion. Its
properties represent Json data that we get returned from facebook
API server.
Rebuild your solution!
Facebook API connector and Json -> C#
converter
Now, we need to install 2 dlls. Facebook.dll will make
contacting Facebok API server easy peasy and Newtonsoft.Json.dll
will helps us with Json string -> C# object conversion. Below,
in article attachments section, there is Required
dlls download available. Unzip it and drop folder content
(4 files in total) into /bin folder inside your
app. Once you've done that, in Visual Studio, right click
References folder, and add reference to both .dll
files that you've just dropped into /bin. If you've
completed any other of my facebook tutorials (except part 1 - login
button), these dlls should already be found in /bin
directory.
Friends controller and view
Time for soooome real coding :) Right click on Controllers
folder and create a new, empty controller. Name it
FriendsController and paste in following code:
using System.Collections.Generic;
using System.Web.Mvc;
using Facebook;
using FacebookLoginButton.Models;
using Newtonsoft.Json;

namespace FacebookLoginButton.Controllers
{
    public class FriendsController : Controller
    {
        public ActionResult Index()
        {
            FacebookFriendsModel friends = new FacebookFriendsModel();

            var client = new FacebookClient(Session["accessToken"].ToString());
            dynamic fbresult = client.Get("me/friends");
            var data = fbresult["data"].ToString();

            friends.friendsListing = JsonConvert.DeserializeObject<List<FacebookFriend>>(data);

            return View(friends);
        }

    }
}
This controller contacts facebook API server, converts Json into
native C# object using the Model we created earlier and passes it
to the view so the details can be nicely presented on the web
page.
View() should be highlighted in red indicating that there is no
view file (.cshtml) associated with this method. Right click on
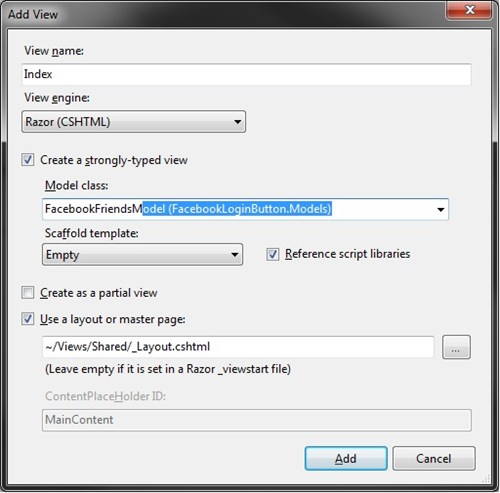
View() and select add view. Now, be carefull, since we're passing
an object to it, it needs to be a strongly-typed view. This will
make all object properties accessible via @Model variable. Before
clicking OK, make sure all properties in the window are set as on
following screen:
Once the view has been added, you should find a new .cshtml view
file under Views/Friends/Index.cshtml. Open that file and paste in
following code:
@model FacebookLoginButton.Models.FacebookFriendsModel

@{
    ViewBag.Title = "Part 3 - Facebook Friends Listing";
    Layout = "~/Views/Shared/_Layout.cshtml";
}

<h2>Part 3 - Facebook Friends Listing</h2>

<table>
    @foreach(var friend in Model.friendsListing){
        <tr><td>@friend.id</td><td>@friend.name</td></tr>
    }
</table>
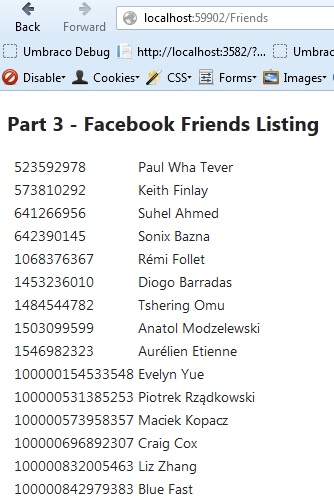
Finally, rebuild your solution, make sure you dont have any
errors on build, press F5 (unless you have it configured as a
host), login to facebook using facebook button and go to
/Friends url. If you've done everything right, you
should see following screen:
Feel free to check out my other facebook tutorials! Aaaand leave a comment if
you found it helpful. I love getting comments :)
Tagged: .NET 4
ASP.NET MVC
C#
Facebook Friends Listing
Facebook Graph Api
JSON
MVC 4