This is the first article on facebook api integration in asp.net
enviorment. It demonstrates how to integrate login button on the
web page in order to obtain access token that we'll need for
further tutorials.
Visual Studio project setup
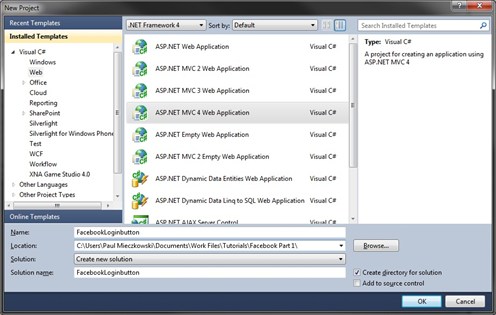
Firstly, let's get started by opening visual studio and creating
new ASP.NET Mvc 4 Web Application. Name it
FacebookLoginButton and make sure .NET Framework 4 is selected.
Click on OK. Another window should now pop up asking for a type of
tempalte you'd like to install in your app. Select An Empty
ASP.NET MVC Project.
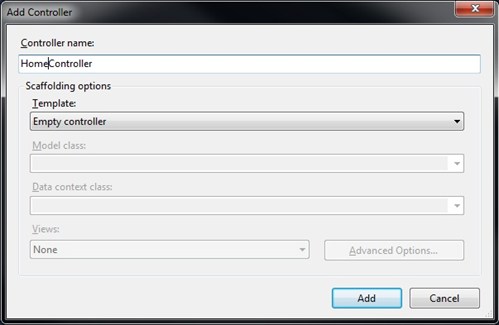
Once you've got your project created, right click on Controllers
folder and Add Controller. Make sure controller name is set to
HomeController.
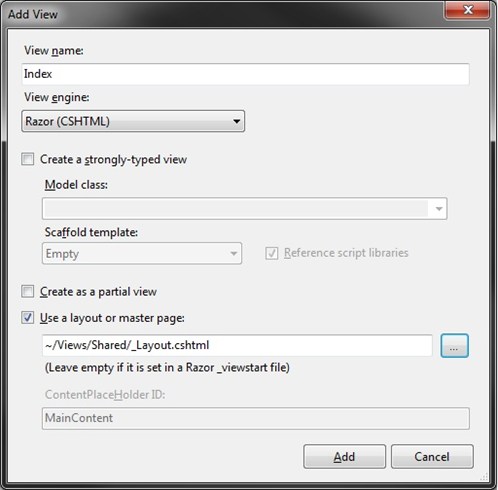
What we need now is a view associated with home controller index
method. To add a view, open newly created HomeController and look
for a line where it returns View() ActionResult. View() should be
highligted in red. Right click on it and select Add View.
Make sure you compile your project before editing anything.
There is some problem with VS 2010 and MVC 4 Razor engine. When you
try to edit .cshtml file without rebuilding your solution first,
VisualStudio will crash.
Import and configure facebook javascript framework
Time for a little bit of javascript-ing. Buuu. Right click on
Scripts and create new Javascript file. Name it Facebook.js. Paste
in following content:
function InitialiseFacebook(appId) {

    window.fbAsyncInit = function () {
        FB.init({
            appId: appId,
            status: true,
            cookie: true,
            xfbml: true
        });

        FB.Event.subscribe('auth.login', function (response) {
            var credentials = { uid: response.authResponse.userID, accessToken: response.authResponse.accessToken };
            SubmitLogin(credentials);
        });

        FB.getLoginStatus(function (response) {
            if (response.status === 'connected') {
                alert("user is logged into fb");
            }
            else if (response.status === 'not_authorized') { alert("user is not authorised"); }
            else { alert("user is not conntected to facebook");  }

        });

        function SubmitLogin(credentials) {
            $.ajax({
                url: "/account/facebooklogin",
                type: "POST",
                data: credentials,
                error: function () {
                    alert("error logging in to your facebook account.");
                },
                success: function () {
                    window.location.reload();
                }
            });
        }

    };

    (function (d) {
        var js, id = 'facebook-jssdk', ref = d.getElementsByTagName('script')[0];
        if (d.getElementById(id)) {
            return;
        }
        js = d.createElement('script');
        js.id = id;
        js.async = true;
        js.src = "//connect.facebook.net/en_US/all.js";
        ref.parentNode.insertBefore(js, ref);
    } (document));

}
This javascript will ensure that we're subscribed to login event
on which we'll submit fb access token to our controller and save it
in session. Also, on each window load, we'll check for fb login
status and alert user accordingly.
Sign up for an app
Now, go to developers.facebook.com and create a new app.
Make sure all app's urls point to the actual address of the app. If
you're running the app from Visual Studio, its address will be
http://localhost:[PORT NUMBER].
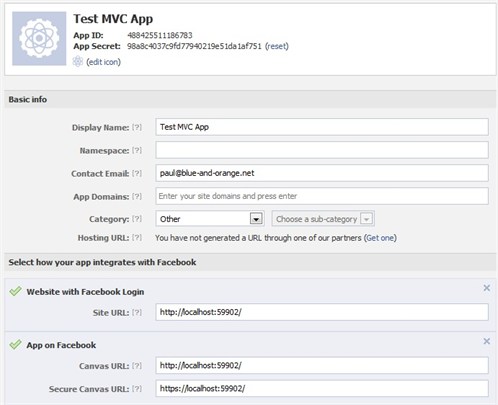
Add FacebookAppId as a key in web.config.
<add key="FacebookAppId" value="XXX" /></pre>
Login model and controller
Next, we need to add account controller that will save facebook
response in session. Before we add it, let's create a model for an
object that we'll pass to account controller. Right click on Models
folder and add FacebookLoginModel.cs (Class).
namespace FacebookLoginButton.Models
{
    public class FacebookLoginModel
    {
        public string uid { get; set; }
        public string accessToken { get; set; }
    }
}
Once we've got our model, we can add AccountController.cs.
using System.Web.Mvc;
using FacebookLoginButton.Models;

namespace FacebookLoginButton.Controllers
{
    public class AccountController : Controller
    {
        [HttpPost]
        public JsonResult FacebookLogin(FacebookLoginModel model)
        {
            Session["uid"] = model.uid;
            Session["accessToken"] = model.accessToken;

            return Json(new {success = true});
        }

    }
}
Login button configuration
To enable facebook framework, make sure you've got following
lines added to your Views -> Shared -> Layout.cshtml file.
Following lines should be added just before body closing tag.
<div id="fb-root"></div>
    <script src="@Url.Content("~/Scripts/jquery-1.6.2.min.js")" type="text/javascript"></script>
    <script src="@Url.Content("~/Scripts/Facebook.js")" type="text/javascript"></script>
    <script type="text/javascript">
        $(function () {
            InitialiseFacebook(@System.Configuration.ConfigurationManager.AppSettings["FacebookAppId"]);
        });
    </script>
Finally, modify Views -> Home -> Index.cshtml by pasting
in following code:
@{
ViewBag.Title = "Part 1 - Facebook Login Button";
Layout = "~/Views/Shared/_Layout.cshtml";
}
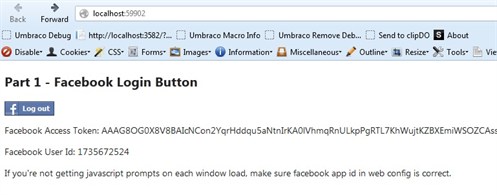
<h2>Part 1 - Facebook Login Button</h2>
<fb:login-button autologoutlink="true" perms="read_friendlists, create_event, email, publish_stream"></fb:login-button>
<p>Facebook Access Token: @Session["accessToken"]</p>
<p>Facebook User Id: @Session["uid"]</p>
<p>If you're not getting javascript prompts on each window load, make sure facebook app id in web config is correct.</p>
That's it. Feel free to download comleted solution attached to
this post.
Feel free to check out my other facebook tutorials! Aaaand leave a comment if
you found it helpful. I love getting comments :)
Tagged: .NET 4
ASP.NET MVC
C#
Facebook Graph Api
Facebook Login Button
JSON
MVC 4